Pages

Friday 5 December 2014

Dragon's Lair Designs Challenge - Christmas Time

Good Morning everyone hope you are all well today and starting to get into the Christmas Spirit and 
if you are you are going to love the new challenge that is starting over on the Dragon's Lair Designs blog as this month it is all about Christmas Time

For my inspiration this month I have used Jiggy in front of fire 


To make this card I started with an 8" x 8" blank card and used a corner punch on all the corners for a nice decorative effect I then found some nice paper from my stash to cover the card with, next I took some pretty holly paper and cut a strip from it measuring 10cm and backed it onto green card which I then added 2 strips of lace ribbon to, I then added some foam pads to the back for dimension.

After I had printed off my gorgeous image and coloured him with my Copic Alcohol Markers I punched the corners to match the card and matted him onto green card and again added foam pads to the back to raise the image up for extra dimension.  To add some sparkle I added some glitter glue around the edge of the image and around the edge of the card and some green glitter glue along the strip.


Next I die cut some snow flakes and holly leaves and used some pretty flowers to frame my image which I attached with silicone glue and a Christmas sentiment almost finishes off the card, all that was left to do was to add some glitter glue to the centre of the snowflakes and to the stockings on the image


I hope that you like my card and that it has given you some inspiration to enter the challenge yourself

Thanks for taking the time to read this blog and please feel free to leave me a comment

Best wishes and Merry Christmas
Vanessa xxx


Saturday 22 November 2014

Inspiration project using Franceska Collection by Dragons Lair Designs

Hello everyone today I have some inspiration for you using the Francheska Collection from Dragons Lair Designs


So I started with an 8" x 8" white card base and then printed off the backing paper that I wanted to use, I matted this onto some kraft card and glued this to the card base.

Next I printed off the Francheska Collection Elements, the Journalling Cards and the Tag Sheet 

I chose one of the tags from the tag sheet and die cut it out using the Spellbinders Grand Labels One, I used the smallest one for this and then inked around the edges with a mix of Vintage Photo Distress ink and Rusty Hinge Distress Ink, I then matted this onto Kraft card, to get the smaller mat I drew around the die that I used to cut out the tag and then cut this out with scissors, this was then mounted onto foam pads and placed in the top left hand side


After this I fussy cut out all of my elements, some of which needed a craft knife to do so but the result was worth it and didn't take too long and for those of you who don't own a die cutting machine this pack is just lovely.  Next I added foam pads to 3 corners of the Journalling Card and then glue on the corner where it was going to overlay the floral tag and then glued my leaves into place, I added foam pads to the back of the flowers and positioned them over the leaves and glued my two butterflies down.


I then added glitter glue to the centre of the flowers and once this had dried I added glossy accents on top of this to really give dimension to them.  I then glued gold and black gems to the bodies of the butterflies and black gems to each corner of the card.


I hope that you like my latest piece of inspiration for you and if there is anything else you would like to know just let me know 

Best wishes
Vanessa 
xx

Friday 7 November 2014

Dragon's Lair Designs Challenge - Autumn Colours

Hi everyone, another month has gone by and it is time for the next challenge on Dragon's Lair Designs.  This time the theme is Autumn Colours

For my inspiration this month I have used Yoohoo's Pumpkin 


So for this card I wanted to make a shaped card so I used Spellbinders Grand Labels Dies to cut out the base for the card.  I then used the same dies and cut out a frame for the front of the card, after I had done this I used a floral stamp and vintage photo distress ink to decorate the frame.  Next I printed off my image and coloured it in using Copic Alcohol Markers, I then die cut the image out and inked around the edges using Dried Marigold and Wild Honey Distress Ink.  I raised the frame up on foam pads and then placed the image flat in the middle.

To finish off the card I used a Daisy flower Die, a flourish die and some small flower embellishments from my stash


I inked the edges of the flowers and the flourish with dried marigold distress ink and then glued them to the right hand corner of the card with Cosmic Shimmer glue, I then added some liquid pearls to the centre of the flowers


I hope that you like my card and that it has given you the inspiration to enter the challenge yourself 

Thank you for taking the time to read this post and if you would like to leave me a lovely comment that would be appreciated too 

Bye for now 
Vanessa xx


Monday 20 October 2014

Trick or Treat

Hello everyone hope you are all well today and in a good crafty mood :) 

Today I am hoping to give you some inspiration on what to do with the Trick or Treat Set which I think is Spooktacular lol.  


So as you can see I have made a card for you today 


To make this card I started off with an 8" x 8" cream card base, next I printed off all of the elements I wanted to use, which were Journal CardsVerses, and Elements.  
To create my background I started with a 7" x 7" piece of white card and used distress inks to colour it, to do this I used Mustard Seed, Wild Honey, Dried Marigold and Rusty Hinge and used the blending tool to randomly apply the colour on the card, going over and over it to build up the depth

Next I splashed some water onto the card to add to the spooky effect I was trying to create, I then matted this onto Creative Expressions Ginger Cardstock

The next thing I did was to cut out all of the elements that I had printed out, I matted the witch on the broom journalling card onto the ginger card stock too, and added some foam pads to the back to give it some dimension.  I used an oval die to cut out the verse and inked around the edges with wild honey distress ink and added foam pads to the back again for extra dimension.

I used a creative expressions die by Sue Wilson to cut out the leaves then placed the flowers on top 
As the pearls that I wanted to use were not the right colour I used a Promaker to change them and also added depth to the flower petals
I then added my bats and added some glitter with a silver glitter pen to them, I also added a bit to the cat and the owl in the picture and around the edge of the verse.

I hope you like my card and if you would like to leave me a comment well that would be appreciated too

Bye for now 
Vanessa 
xxx

Saturday 11 October 2014

One Stamp One Day

hello I'm back again with another project for this fabulous One Stamp One Day Project by Oak House Studio

This time I made a tag to hang over a door 


For this one I started with a piece of white card and die cut a circle out of the top.  Next I masked off a strip with low tack masking tape.  Using Adirondack Latte Dye based ink I randomly stamped the corner all over the panel.

I coloured the flowers using Oak House Studio Ink in a Bottle - French Wine 
The leaves were coloured with Bundled Sage Distress Ink and Forest Moss and the small berries were coloured with Antique Linen Distress Ink.

Next I removed my masking tape and stamped my Christmas Sentiment, after adding some colour to the leaves and the word Holly I defined the strip by drawing a wavy line with a black fine liner pen.

To finish off I brushed some Antique Linen Distress Ink around the edges

I hope you like it 

Bye for now
Vanessa 
xxx

One Stamp One Day

Hello Again

I'm back with some more inspiration for the one stamp one day project

This time I made an A5 sized card


For this card I my main focus was repeat stamping 

So I started with an A4 piece of card and folded it in half, then using Watering Can Archival Ink I stamped my corners in a row along the bottom of the card, to get the balance right I started in the middle of the card and worked my way outwards, I then did the same thing along the top of the card.

Next on a separate piece of card I stamped a row of corners again but this time I added colour to them by painting them with distress inks.  

To finish the card I used a blending tool and Bundled Sage Distress Ink around both the edges of the panel and around the edges of the main card to take the whiteness away.  I then attached the panel using foam pads to the centre of the card.

I hope you like my card and that it has given you some inspiration today

Bye for now 
Vanessa 
xxx


Oak House Studio One Stamp Project

Good Morning everyone 

Today I have been invited by Lynnda from Oak House Studio to join in with the One Stamp One Day Project. 
This is all about taking one stamp to create a variety of projects and the stamp being used is the Christmas Corner Stamp I have included a link to the shop if you would like to purchase one of these stamps to create your own projects, and of course to have a look around the shop as there are lots of lovely items to add to your craft stash.

For my first project I decided to make a simple but effective Christmas card


The card is 8" x 8" in size 

To start with I stamped out my corner 8 times, I then cut 4 whole corners out and 4 of the middle flowers, this stamp is so easy to cut out too.  After I had finished my cutting I coloured them using Spectrum Noir pencils 

Next I stamped a lovely bold Christmas sentiment onto a 6" x 6" piece of card, I did some faux matting and layering by taking a ruler and a black Sharpie pen around the edges, I put foam pads on the back to give it some dimension and placed this on top of a 7" x 7" piece of card that I had again gone around the edges with a black Sharpie pen, I put foam pads on the back again and then put this on my 8" x 8" card base 

To finish off I arranged my cut out corners and flowers around the sentiment and then glued them into place using Pinflair Glue Gel to give further dimension I hope that you will agree that this stamp makes a beautiful wreath and a very nice card

Bye for now 
Vanessa 
xxx 


Friday 3 October 2014

Dragon's Lair Designs Challenge - Anything Goes

Good Morning Everyone and welcome to a new Challenge starting over on Dragon's Lair Designs - Anything Goes

For my inspiration for you this month I decided to use the very cute image of Yoo Hoo In Floral Frame and the Southern Comfort Papers 


To make my card I started off by printing my image onto Neenah Dessert Storm Card and coloured him in using Copic Markers, next I fussy cut the image out which was very easy to do.  

I made my card base 7 1/4 inches by 8 1/4 inches and used craft card to do this, then I took two of the papers and distressed the edges with Vintage Photo Distress Ink and then glued them to the card.  I took some wide gold ribbon and then some thin brown ribbon and placed this over the join of the papers.

the next thing I did was to use the Spellbinders Shapeabilities Frosty Forms dies and die cut the small corner flourish out 7 times out of gold card, 5 of these made a boarder at the bottom of the card and the other two were placed in the top corners


I then cut out the longer flourish from the set out of gold glitter card and placed these at either side of the ribbon, this gave my an idea as the waste from this had a lovely heart shape in it, so I decided to use this to edge my cute owl image, these dies are so easy to cut out and release very easily so don't be put off by all the extra cutting 


After I had attached all of my hearts to my image using the Cosmic Shimmer glue I added foam pads to the back of the image and placed it onto my card.  I finished off my image by adding some white dots to the outside of the frame and some gold dots to the inside of the frame and some glitter pen to the flowers and butterflies

I hope you like my card and that it gives you some inspiration to create your own and enter our challenge, you have until the 6th of November to do so, so go on have a go Anything Goes after all :) 

Thanks for taking the time to read this post and please do feel free to leave me a lovely comment, they really are all appreciated 

Best wishes
Vanessa xx


Monday 29 September 2014

Clarity Stamp Challenge - Nature

Here is my card for the Clarity Stamp Challenge for the theme Nature


At the recent Clarity Open Day at Catterick I learnt how to use Alcohol Inks, this was a technique I had always been meaning to try but kept putting it off thinking it would be difficult well let me say I am so glad that I was shown just how easy it is and it is also very fun to do.

The background was created by dabbing various colours of Rangers Alcohol Inks onto some glossy Clarity Card.  I then stamped the Funky Foliage Collage and the verse using black Archival ink, this was then matted onto black card and then onto a 5 inch by 7 inch white card base adding some black gems to finish

I hope you like my card and thank you for your visit today

Best wishes 
Vanessa 
xx 

Lavinia Challenge Entry - Add Some Ribbon

Here is my entry for the Lavinia Challenge this month - Add Some Ribbon


I hope you like it, it certainly was an enjoyable one to make

Bye for now 
xx

Monday 22 September 2014

A Little Bit of Southern Comfort

Hi there everyone, hope you are all well today

Today's post is all about the Southern Comfort Set from Dragon's Lair Designs

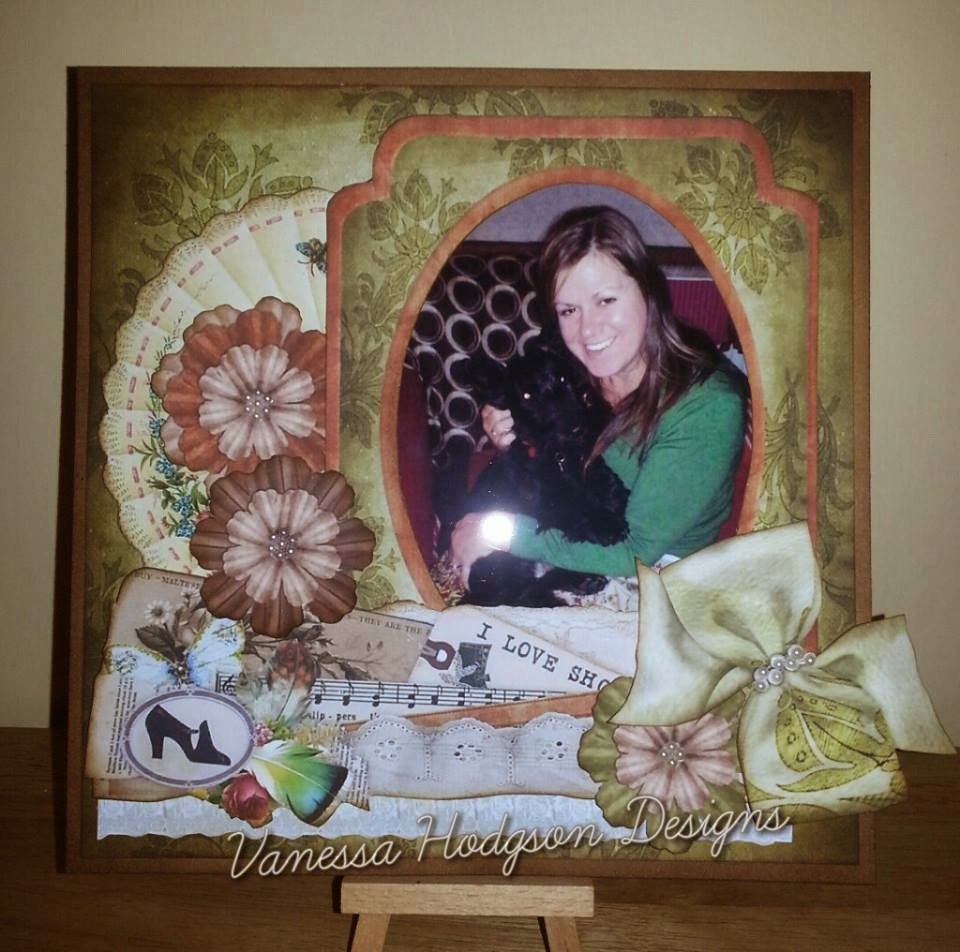
So for this one I decided to do a scrapbook layout dedicated to my wonderful Scottish Terrier Dougal whom I lost to ill health last year and I hope you will agree a very fitting tribute to him.

I started off by printing off all of my elements to create my design


My scrapbook page is 8" x 8" in size and I started off by distressing the edges of the paper with Vintage Photo Distress Ink and matting it onto Brown Card

Next I fussy cut out all of the elements out and inked the edges of them with the Vintage Photo Distress Ink.

I then cut my frame out and attached my photo behind, adding some foam pads to give some dimension 


Once I had my frame in place, I added the fan to the side and then added the lace clusters underneath again raising them up on foam pads to get a bit of dimension.  I added the big bow which again I just had to give some dimension to with foam pads


Finally (almost) I added some of the Southern Comfort Paper Flowers beneath the bow and to the side of the frame finishing the whole thing off by adding some pearl gems


I love this set and hope that you do too, it really is so versatile and very easy to use and has certainly helped me make a lovely scrapbook layout that I will treasure.

Thank you for taking the time to read my post and please do feel free to leave me a comment 

Best wishes 
Vanessa 
xxx

Wednesday 10 September 2014

A little bit of Music

Good Afternoon Everyone I hope you are well and enjoying the lovely warm weather we are currently blessed with.
Have you ever been asked to make a card where you thought you did not have the correct stamp to complete it?  Well I have and I thought I would share with you how I got around this 


The theme for this card was to be music but I did not have any music stamps, or so I thought, looking through all of the stamps that I have I found the music notes this gave me the basis to work form and really if you don't have a music note stamp they are quite easy to draw.  

So to make the card I matted some white spotty paper onto black card, the size of the card is 8" x 8"
I then cut 3 strips of black spotty paper and made them into banners which in turn were matted onto black card.  Next I took a white piece of card and stamped a swirly pattern onto it, then I used the little musical note stamps to fill in the gaps, this was matted onto black card.  I stamped happy birthday onto white card which was then matted onto black card and glued centrally under the patterned panel I had created.

I then stamped the hearts onto white card, used an alphabet stamp set to spell out the word music and cut each one out and again matted them onto black card, I put foam pads on the back of each one to get some dimension and placed them centrally on the patterned panel.

To finish off the card I added a small black button to each of the banners and some black gems in the corners and underneath the happy birthday sentiment.

I hope you like my latest post and if you would like to leave me a comment you would be more than welcome :) 

have a lovely day everyone 

xxx

Friday 5 September 2014

Anything but a Card

Good morning everyone and welcome to the September and the new challenge starting on Dragons Lair Design Challenge

The theme for this challenge is Anything But A Card and I decided to use the Spring Flowers Digi Stamp and used this to make a letter rack


So to make this I started with a cereal box which I cut in half and trimmed the sides so that they were on the diagonal 


I then covered the boxes with card and patterned paper


once I had done this I stuck the two boxes together 


Next I used Docrafts Digital Designer to get lots of different sizes of the flowers which I then printed, and cut out.  I used Promakers to colour the flowers


I attached the flowers to each layer with foam pads to give them dimension


I then finished off the letter rack by adding some ribbon around the centre

I hope you like my take on this months challenge and hope that I have given you some inspiration to enter the challenge yourself 

Thank you for taking the time to read my post and please feel free to leave me a lovely comment :)

Wednesday 3 September 2014

Up up and away

Hello everyone

I thought that I would share my latest card that I have made with you


To make this card I started off with a white piece of card which I coloured gently with Cloudy Blue Adirondak Ink 

Next I stamped the Clarity Stamp Hot Air Balloons onto the card and then onto several different patterned papers which I cut out and raised up with foam pads to give each of them dimension 

The next step was to stamp the birds and I used a lovely stamp set by Inkilicious which included the sentiment Let Your Dreams Take Flight which I felt went perfectly with the theme I had chosen, this was then matted onto red then brown card 

I stamped the Happy Birthday sentiment and again matted onto red and then brown card.  I made a bow from beige ribbon and added a red button and some bakers twine to secure it.  Some lovely patterned papers finished off the card perfectly.

I hope that you like my card and thank you for taking the time to read my blog please feel free to leave me a lovely comment 
Hi there, well here I am setting up a new blog for myself...I usually get my husband to do these things for me so bear with me and I will be posting some lovely new card designs soon